Eventify Logo
Eventify LogoWhy Eventify
Platform
Core Products
Event Management Software
Event Registration Software
Event Ticketing Software
On-Site Badge Printing
Event Check-in Software
Lead Capture & Retrieval
Mobile Event App FEATURED
Event Management
Budget Planner
Speakers & Abstracts Mgmt.
Maps or Floor Plan Builder
Agenda Management
Event Reporting & Analytics
Attendee Engagement
Meetings & Matchmaking
Event Networking App
Gamification
Live Polls & QA
Community Builder
Event AI
NEW
More Platform Tools
Custom Branding & Whitelabeling
Widgets & Embeds
Security and Compliance
Pricing Plans
Request a Demo
Download Feature Deck Presentation
Solutions
industries
Non-Profit Associations
Event Agencies
Education
Information Technologies
Healthcare
Pharma
Retail
Pharma
USE CASES
Virtual Events
Hybrid Events
In-Person Events
Community Meetups
Workshops & Trainings
B2B Conferences
Expo and Fairs
Trade Shows
Virtual Job Fairs
Medical Events
Product Launchs
Sales Kickoffs
Education Events
Networking Events
Learning & Development
Internal Events
Awards & Recognition
Virtual Exhibitions
White Label Mobile Apps
Native Event App
Deliver a seamless event experience with your own branded app.
Event Community App
Empower networking and collaboration within your event.
Lead Scan & Retrieval App
Simplify lead scanning and retrieval for exhibitors and sponsors.
Pricing Plans
Request a Demo
Download Feature Deck Presentation
Features
Content Management
Agenda Builder
Speaker Profile
News
Event Guide
Social Boost
Live Screen Display
Registration
Event Ticketing
Check-in Software
Abstract Management
Event Content Mgmt.
Badge Printing
Dynamic Form Builder
Floor Planner

Supervisa el progreso y el estado de las iniciativas clave en tiempo real

Floor Planner
Event Itinerary
Exhibitors & Sponsors
Exhibitor Profile
Sponsored Ads
Lead Scanning
Interactive Maps
Engagement
Event AI
Matchmaking
Chat & Meetings
Social Feed
Community Forum
Poll & Live QA
Gamification
Communications
Push Notification
Email Notification
mORE tOOLS
Event Surveys
Analytics & Reporting
Pricing Plans
Request a Demo
Download Feature Deck Presentation
Resources
Resources
Blogs
Knowledge Base
Customer Stories
Feature Updates
FAQs
Podcasts
Company
About Eventify
Security & Compliance
Careers
Support
Contact Us
Pricing Plans
Request a Demo
Download Feature Deck Presentation
Customer Stories
Pricing
Request a Demo
Contact Us
Request a Demo
Download Eventify Feature Presentation
Trusted by 5000+ Event Managers
99% Positive Reviews
Terrific Data Security
Help for attendees, exhibitors, sponsors & speakers
Getting Started as a ParticipantFor AttendeesFor Exhibitors & SponsorsFor SpeakersFor Abstract Authors & ReviewersHelp for event organisers
Topics

Fresh On Eventify

How Are User Credits Calculated?

How Attendees Log In to the Event App or Web Portal

How Organisers Can Share Help Articles with Attendees, Exhibitors and Speakers

How to Choose an Eventify Plan to Host Your Event

How to Connect Eventify to Google Analytics 4 (GA4)

How to Enable Two-Factor Authentication (2FA) for Admins

How to Log In to the Eventify Admin Panel

How to Reset a Forgotten or Lost Admin Password

Why Stripe's Totals Don't Match the Amounts in Eventify's Reports

Eventify Admin Settings

How Are User Credits Calculated?

How Eventify Platform Fees Work: Wallets and Fee Receipts

How to Add Multiple Admins to Manage Your Event

How to Change Your Login Email or Delete Your Eventify Account

How to Close an Event in Eventify: Archive or Delete

How to Enable Single Sign-On (SSO) for Your Event

How to Find Your Account Usage History

How to Fix Admin Panel Access, Cache and Email Issues

How to Manage Companies in Account Settings

How to Set Admin Roles and Permissions in Eventify

How to Submit Details for Your White Label Event App

How to Upgrade or Renew Your Eventify Plan and Buy Add-ons

How to View Billing Details, Update Billing Info and Pay Invoices

Understanding MAA Credits and License Usage in Eventify

What Happens When Your Eventify Subscription Expires

Setting Up An Event

How to Add a Custom Domain for Your Event Landing Page

How to Add and Edit Interest Tags for Attendee Networking

How to Change the Event Timezone

How to Change the Event URL

How to Create a New Event in Eventify

How to Duplicate an Event in Eventify

How to Find Event Vendors with ProFinder

How to Set Up a Virtual or Hybrid Event

How to Set Up the Live Display Screen for Your Event

How to Set Your Event Name and Description (and Avoid Restricted Words)

How to Set Your Event Start and End Dates

How to Turn Event App Features On or Off

How to Use the Event Overview Page and Setup Checklist

Customise The Event Branding

How the Branding Module Works for Your Branded Event App

How to Customize Profile Picture Frames in the Event App

How to Customize the Event App Menu, Tab Bar and Quick Links

How to Customize the Event App Splash Screen

How to Set Up Social Boost Posts for Event Social Sharing

How to Set Your Event App Logo, Cover and Brand Colors

User Registration

Can I Rename The Profile Details Section In The Registration Form?

Can I Use Google Forms or Microsoft Forms for Event Registration?

How to Add and Sell Exhibitor Booths on a Floor Map

How to Add a New Floor Map for Exhibitor Booths

How to Add Social Links to Registration Forms

How to Create a Public Event Registration Link

How to Create a QR Code for Event Registration

How to Make a Custom and Dynamic Checkout Form

How to Make Registration Form Questions Mandatory

How to Modify a Registration Form

How to Set Up Approval-Based Registration

How to Set Up a Ticket Refund Policy for Your Event

How to Update Checkout and Registration Form Settings

Which Fields Cannot Be Deleted From The Registration Form?

Why Does The Date Format Look Different For Different Attendees?

Event Settings

How to Add the Why Attend AI Widget to Your Event Website

How to Add or Manage Multiple Admins for an Event

How to Customise Email Templates for User Groups

How to Integrate Salesforce with Eventify

How to Integrate HubSpot with Eventify

How to Export Eventify Data with Zapier Triggers

How to Import Data to Eventify Through Zapier

How to Set Up Multiple Languages for Your Event App

How to Use Integrations to Embed Forms, Tickets and Sessions

How to Change Your Eventify Account Password

How to View Billing Details, Update Billing Info and Pay Invoices

How to Find Your Account Usage History

How Are User Credits Calculated?

How to Submit Details for Your White Label Event App

How to Schedule

How to Bulk Add Sessions to Your Event Schedule

Sell Individual Sessions: Standalone Pricing & Purchase Links

How to Manage Session Check-Ins and Attendance Tracking

How to Export Your Event Schedule and Session Details

How to Set Up Check-In Types for Specific Sessions

How to Set When Attendees Can Rate a Session

How to Delete All Tracks with Sessions at Once

How to Bulk Assign Users to Sessions

How to Delete All Sessions at Once

How to Bulk Edit Sessions in Your Event Schedule

How to Add a Session to Your Event Agenda

How to Bulk Import Sessions from Excel or CSV

How to Link Sponsors to a Session

How to Link Exhibitors to a Session

How to Link Speakers to a Session

How to Collect Session Ratings and Feedback

How to Enable Live Polls for a Session

How to Enable Live Q&A for a Session

How to Set Up and Join Virtual Sessions with Zoom or YouTube

How to Bulk Import and Export Event Data

How to Showcase Important Event Media With or Without Restrictions

How to Enable Self Check-In for a Session

How to Download the Event Schedule as PDF or Excel

Can Multiple Speakers Speak in the Same Session?

Can I Have a Pre-Recorded Virtual Session?

How to Add Private Sessions to Your Event

How to Bulk Add Sessions (Import or Bulk Edit)

How to See Which Attendees RSVP to Your Session

How to Create Paid Sessions with Tickets

How to Add Multiple Tracks to Your Event Schedule

How to Add a Schedule to Your Event

Manage Attendees

How to View Attendee Activity and Login Logs in the Activity Tab

How Attendees Log In to the Event App or Web Portal

How to Restrict Attendees to Single Device Login

How to Make Login Mandatory for Your Event App

How to Add Attendees Manually

How to Send Welcome Emails to One or All Attendees

How to Restrict Features Based on User Groups

How to Create and Customise User Groups

How to Turn Matchmaking User Suggestions On or Off

How to Download Uploads and Handouts From the Event App

How to Manually Add Attendees to Your Event

How to Manage Attendee Access with Registration Status

How to Resend the Welcome Email to Attendees

How to Manage Event Attendees in the Admin Panel

How to Update or Delete an Attendee's Details

How to Classify Attendees with User Groups

How to Share Private Files with Attendees

Manage Attendees

No items found.
No items found.

Manage Ticketing

How to Give Attendees Access to Specific Event Days

How to Remind Buyers to Assign Their Tickets

How to Connect Regional Payment Gateways for Ticket Sales

How to Include Sessions in Tickets or Sell Them as Add-Ons

How to Import Existing Ticket Orders

How to Set Up Early-Bird and Tiered Ticket Pricing

How to Use Advanced Ticket Settings

How to Create Sponsor and Exhibitor Tickets with Included Passes

How to Enable and Manage the Waitlist for Sold-Out Tickets

How to Configure Registration Settings on Eventify

How to Build an Event Registration Form on Eventify

How to Design and Print Event Name Badges on Eventify

How to Connect a Payment Gateway on Eventify

How to View and Export Sales Reports on Eventify

How to Mark an Offline Order as Paid on Eventify

How to Update an Existing Ticket Order on Eventify

How to Resend an Order Confirmation Email on Eventify

How to Cancel a Ticket Order on Eventify

How to Set Up Free Event Tickets on Eventify

How to Create and Manage Ticket Types on Eventify

How to Issue a Refund for a Ticket Order

How to Create a Ticket Order Manually

How Offline Payment and Pay Later Work on Eventify

How to Add or Change a Ticket Tag

How to Search or Filter Sold Tickets

How to Transfer a Ticket to Someone Else

How to Download a Lost Ticket Invoice

How to Export and Share Ticket Sales Reports

How to Track Your Ticket Sales

How to Set Ticket Prices and Choose Who Pays the Fees

How to Edit a Ticket on Eventify

How to Set Up Payment Options for Event Tickets

How to Delete a Ticket on Eventify

How to Create a New Event Ticket on Eventify

How to Manage Event Passes and Your Ticket Sales Page

How to Export Your Attendee List to Excel

How to Manually Allocate Tickets to Special Guests

Can One Attendee Have Multiple Tickets?

How to Check In Attendees at Your Event

Badge Scanning, Check-In & Badge Printing

How to Email Badges to Attendees Before the Event

How to Design a Double-Sided Event Badge

How to Set Up Kiosk Mode for Event Self Check-In

How to Use the Check-In Dashboard to Track Arrivals

How to Undo an Attendee Check-In on Eventify

How to Check In Attendees with the Eventify App

Brother Printer Error Codes for Event Badge Printing

How to Export a List of People Who Scanned Exhibitors or Sponsors

How to Customize the Kiosk App for Badge Printing

How to Set Up a Brother Label Printer for Badge Printing

How to Set Up a Zebra Printer for Event Badge Printing

Which Printers Can I Use to Print Event Badges?

How to Reprint or Reassign a Misplaced Badge

How to Print Event Badges Onsite

How to Assign Different Badges to Different User Groups

How to Make Accurate Event Badges with Attendee Data

How to See How Many Attendees Actually Checked In to Your Event

How to Make Event Check-in Faster for Large Crowds

Eventify Analytics

How to Add a Trivia Challenge in Gamification

Is There a Social Feed Open to All Attendees in the Event App?

How Do I Generate Leads? Lead Retrieval for Exhibitors

How to Get Your Event Analytics Overview from the Dashboard

How to Get Session Analytics Data for Your Event

How to Get Speaker Analytics Data for Your Event

How to Analyze Attendee Networking at Your Event

How to Analyze Chat Interactions and Engagement in Your Event

How to Analyze Social Feed Interactions at Your Event

How to Get Sponsor Analytics Data for Your Event

How to Get Exhibitor Analytics Data for Your Event

Where to Find Advertisement Insights for Your Event App

Can I Download Session Analytics Data?

How to Get Event Analytics Data for a Custom Date Range

How to Check In Attendees at Your Event

Outreach

How to Track and Resend Event Emails with the Email Log

How to Manage Event Email Templates in Eventify

Does Eventify Support WhatsApp Notifications?

How to Generate and Send Event Certificates to Attendees

How to Send Event Emails from Your Own Domain with Custom SMTP

How to Edit Event Email Templates and Track Sent Emails

How to Send Email and Push Notifications to Attendees

How to Add a Redirect Link to Push Notifications

How to Send Push Notifications to a Specific Attendee Group

How to Schedule a Push Notification for Your Event

How to Send Custom Push Notifications to Attendees

How to Share Event Announcements Without Push Notifications

What Do Push Notification Statistics Mean in Outreach?

How to Enable Event App Push Notifications on iPhone and Android

Abstract Calls

How to Track Abstracts with the Overview and Reports

How to Manage and Export Abstract Submissions

How to Accept Abstracts and Turn Them into Sessions

How to Publish, Embed and Track Your Abstract Submission Portal

How to Manage Abstract Reviewers and Their Workload

How to Set Up Multi-Round Abstract Reviews

How to Import Shortlisted Abstract Submitters as Attendees

How to Collect Abstracts for Your Event

How to Design a Custom Abstract Submission Form

How to Manage a Large Number of Abstract Submissions

How to Add Abstract Reviewers and Manage Submissions

How to Allow Abstract Resubmission

What Features Does the Abstract Reviewer Tool Offer?

Promotions & Discounts

How to Create Personalized Ticket and Registration Links

How to Track and Manage Promo Codes and Coupons on Eventify

How to Create a Bulk Tiered Discount for Group Tickets

How to Create a Buy X Get Y Coupon on Eventify

How to Create a Discount Coupon or Promo Code on Eventify

How Can I Link a Promo Code to a Single Ticket?

How to Add One Promo Code for All Tickets

Can Attendees Apply Multiple Promo Codes at the Same Time?

How to Set Up Percentage and Amount Based Promo Codes

How Do Promo Code Usage Limits Work?

What Are the Benefits of Promo Codes for Events?

How to Delete a Promo Code on Eventify

How to Edit a Promo Code on Eventify

How to Sell Tickets on Your Website or Outside Eventify

How to Add A Promo Discount

Support & Feedback

How to Answer Attendee Support Chats in the Admin Panel

How to Contact Eventify Support About Event Setup Issues

How to Run Live Q&A and Polls in Event Sessions

How to View and Export Session Ratings

How to Collect Session Feedback with Rating Forms

How to Collect Attendee Feedback with Event Surveys

Manage Contents

How to Add All Speakers at Once with Import

How to Add a Location Map for Your Event Venue

How to Add an Interactive Event Map with Booths

How To Add Booth Staff for an Exhibitor?

How to Add Booth Staff for a Sponsor

How to Add Web Pages and Custom Content with Webview

How to Bulk Import Attendees from a CSV or Excel File

How to Bulk Import Exhibitors from a CSV or Excel File

How to Bulk Import Speakers from a CSV or Excel File

How to Bulk Import Sponsors from a CSV or Excel File

How to Create Sponsor Categories for Your Event

How to Display Sponsor and Advertisement Banners in the Event App

How to Download Exhibitor Files in the Event App

How to Download Speaker Files and Presentations in the Event App

How to Download Sponsor Files in the Event App

How to Edit the Exhibitor Profile Form

How to Edit the Sponsor Profile Form

How to Export Event Gallery Images

How to Highlight News Items in the Event App

How to Let Another User Manage a Speaker Profile

How to Let Attendees Add Photos to the Event Gallery

How to Upload a File for a Speaker

How to Upload and Manage Photos in the Event Gallery

How to Use the Interactive Map for Booths and User Groups

Engagement & Networking

How to Create and Manage Custom Teams for Quests

How to Use the Quest Leaderboard: Individual, Team and Group Views

How to Export Gamification and Leaderboard Data

How to Announce Quest Winners and Notify Them

How to Add Bonus Points to Gamification Participants

How to Configure Gamification Reward Settings

How to Send Participation Certificates for a Quest

How to Manage Quest Entries and Verify Submissions

How to Manage and Organize Gamification Challenges

How to View and Manage the Gamification Leaderboard

How to Set Up Communities for Attendee Networking

How to Set Up an Event Survey for Attendee Feedback

How to Add a Quest Challenge in Gamification

How to Add a Trivia Challenge in Gamification

How to Add a Scan QR Challenge in Gamification

How to Set Up Social Boost for Social Login and Sharing

How to Create Live Polls for Sessions

How to Set Up Live Q&A for Sessions

How to Use Event Gamification to Boost Attendee Engagement

How Attendees Connect and Book Meetings in the Event App

How to Control Who Can Post in an Event Community

How to Create Different Types of Event Communities

How to Build an Event Community in the Eventify App

How to Hide Elements on Your Ticket Page by Injecting External CSS

Written for:
Event Admin / Organiser
Attending, exhibiting, sponsoring or speaking at an event? See the help for attendees, exhibitors, sponsors and speakers.Organising an event on Eventify? See the help for event admins and organisers.
Published on
October 14, 2026
Last updated on
October 14, 2026

You can inject your own CSS into the Eventify ticket page and use it to hide anything buyers don't need to see, such as the "Sale ends on Jan 31, 2027" label, the "12 left" stock badge or the footer links. Every part of the page carries a fixed class name, so one short CSS rule is enough to hide it.

The CSS runs inside the ticket page itself, so the change shows wherever the page appears: on its own link and inside the iframe embed on your website.

Where to find this: Event Dashboard > Registration > Registration Settings > Tracking Code
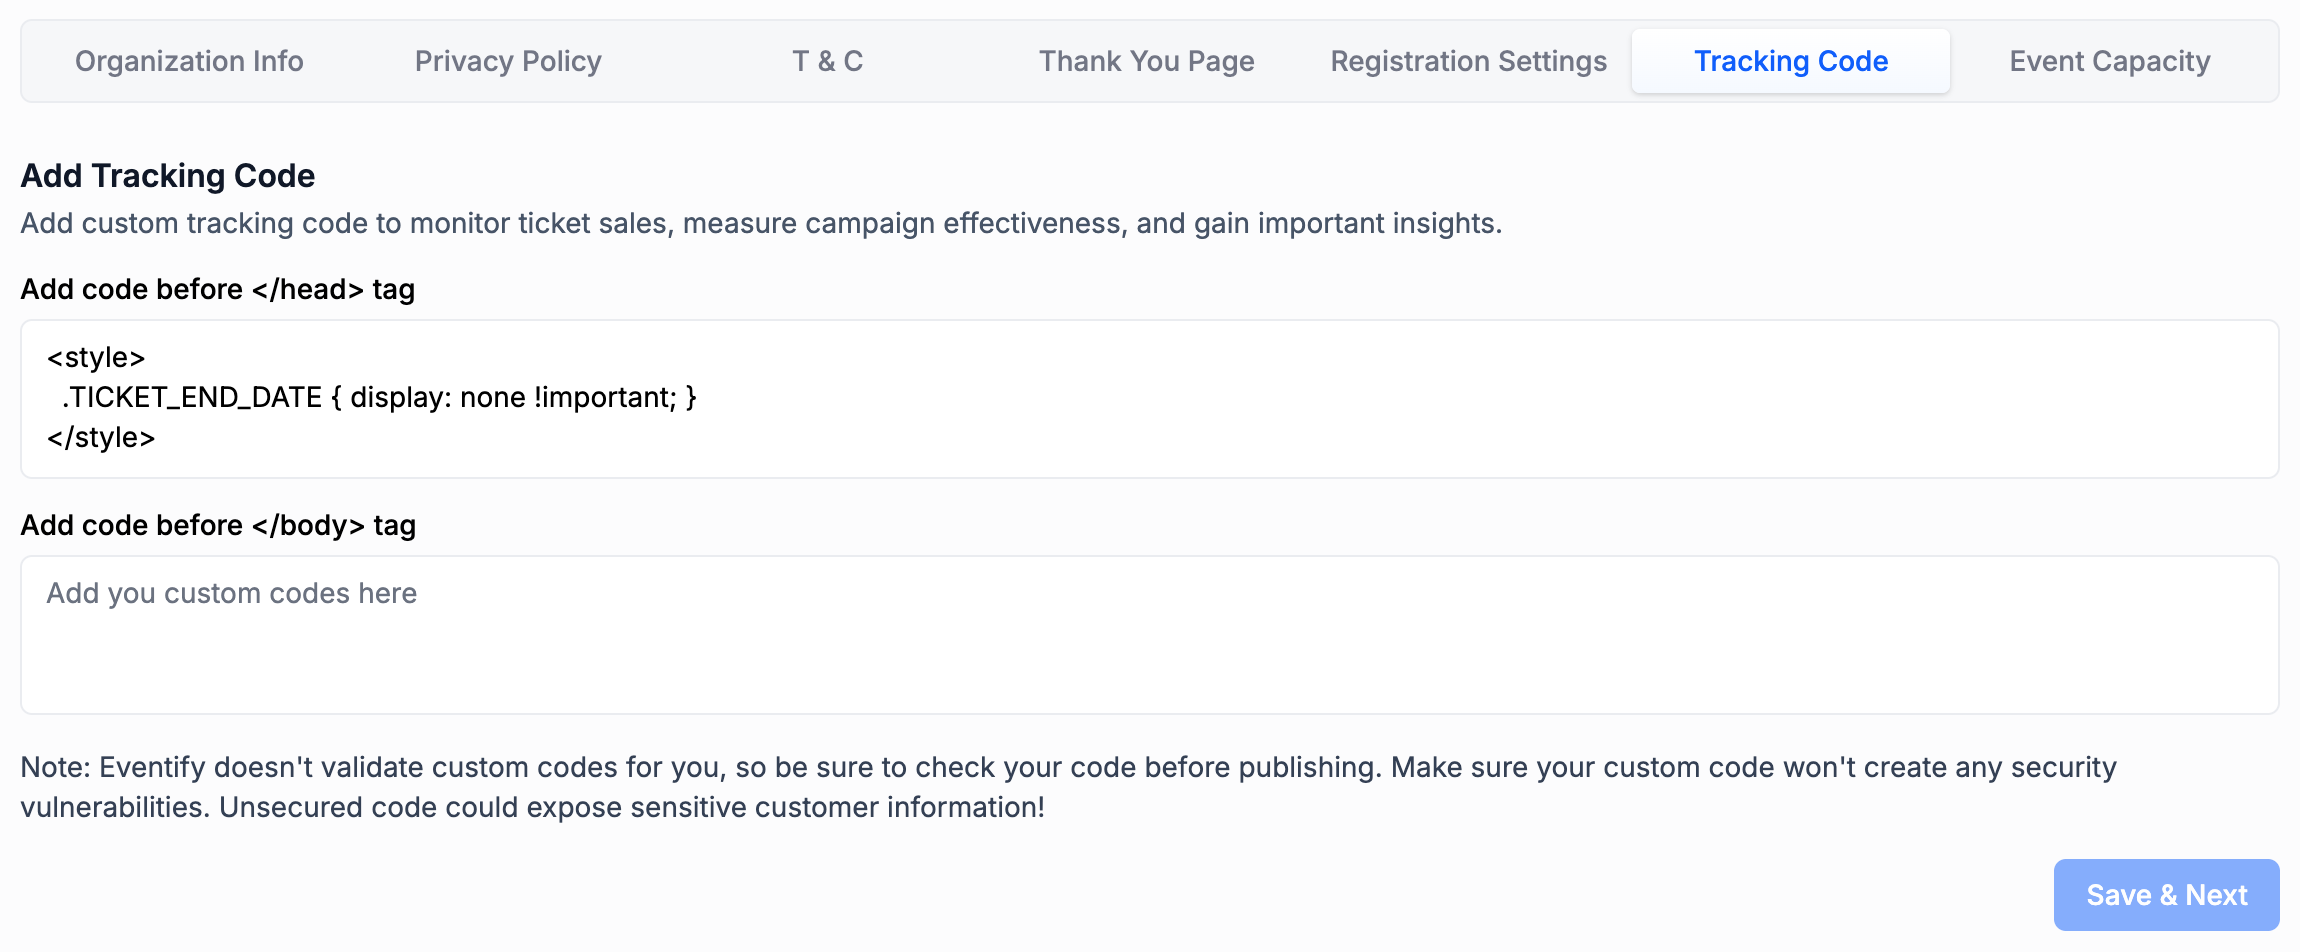
Where you can inject CSS

Tracking Code (whole event)

Registration > Registration Settings > Tracking Code. The same boxes are also under Tickets > Ticket Dashboard > Add Tracking Code. CSS here loads on every page of your event's ticket and registration portal: the ticket list, checkout, registration forms and the thank-you page.

Good for: hiding an item on every ticket and every page. This is the place to start.

Ticket Custom Code (one ticket's link)

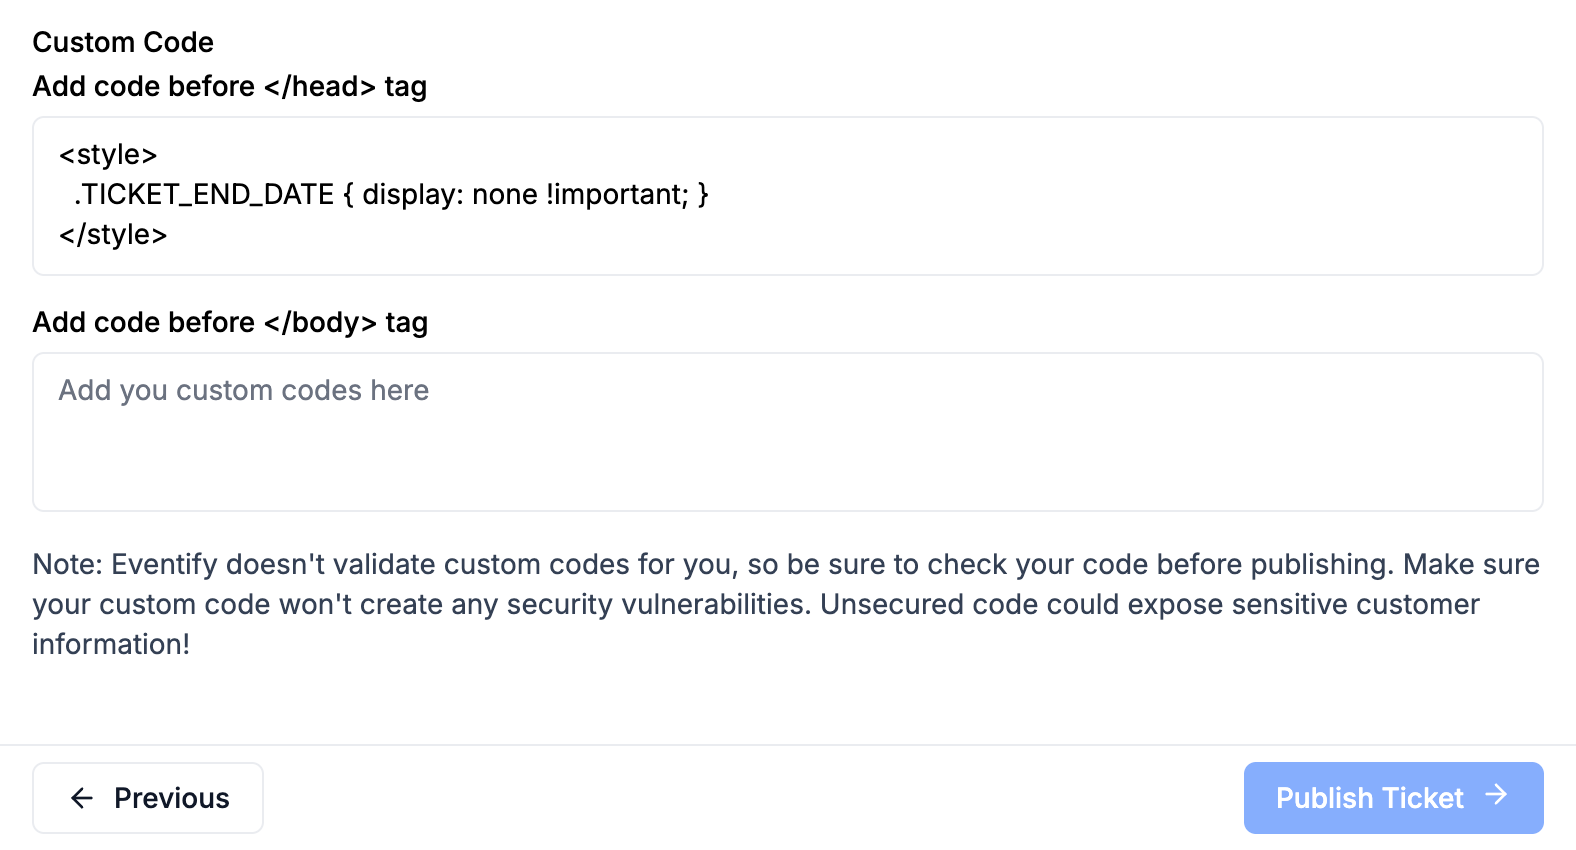
Tickets > Manage Tickets > pencil icon on the ticket > step 5, Settings > Custom Code. CSS here loads only when a buyer opens that ticket's direct link, not on the full ticket list. See "How to inject CSS from a ticket" below.

Good for: changes that should only apply when you share one ticket's own link.

Form Custom Code (one registration form)

Registration > Registration Forms > open the form's settings > Custom Code. CSS here loads only on that registration form.

Good for: hiding fields or text on a single registration form.

How to hide the sale end date

  1. Go to Event Dashboard > Registration > Registration Settings > Tracking Code.
  2. In Add code before </head> tag, paste the code below. If the box already holds code, such as a Google Analytics tag, add yours on a new line underneath. Don't replace what is there.
  3. Click Save & Next.
  4. Click Publish at the top of the dashboard, then Publish Changes. This pushes the change to your live ticket page straight away.
  5. Open your ticket page in a new tab and refresh. The "Sale ends on" label is gone from every ticket, on desktop and on phones.

<style>
 .TICKET_END_DATE { display: none !important; }
</style>

‍

Note: Always wrap CSS in <style> tags. A <link rel="stylesheet"> tag is skipped, so it has no effect. To load a CSS file from your own website, see "How to inject an external CSS file" below.

Hide it for one ticket on the full ticket list

Each class name also exists with the ticket's code added to the end after an underscore. Add these rules to Tracking Code. To hide the sale end date only on the ticket whose code is 3F9A1C:

<style>
 .TICKET_END_DATE_3F9A1C { display: none !important; }
</style>
To find a ticket's code, go to Tickets > Manage Tickets and open the ticket. The Ticket Code is shown on the ticket form. It is also the last part of the ticket's direct link, after /tickets/.

You can list several rules in one block. This hides the sale end date on every ticket and the tags on one ticket:

<style>
 .TICKET_END_DATE { display: none !important; }
 .TICKET_TAG_3F9A1C { display: none !important; }
</style>

How to inject CSS from a ticket

Every ticket has its own Custom Code box. CSS you add there loads only when a buyer opens that ticket's direct link, the link that ends in /tickets/ followed by the ticket code. It does not load on the full ticket list, so other tickets and the list itself stay as they are.

  1. Go to Tickets > Manage Tickets and click the pencil icon on the ticket.
  2. Click Continue until you reach step 5, Settings.
  3. Under Custom Code, paste your CSS into Add code before </head> tag. The code below hides the sale end date.
  4. Click Publish Ticket.
  5. Click Publish at the top of the dashboard, then Publish Changes.
  6. Open the ticket's direct link and refresh. To get the link, go to Tickets > Ticket Dashboard > Embed On Your Website and pick the ticket.

<style>
 .TICKET_END_DATE { display: none !important; }
</style>

‍Only one ticket shows on its own link, so plain class names are enough here. You don't need to add the ticket code to them.
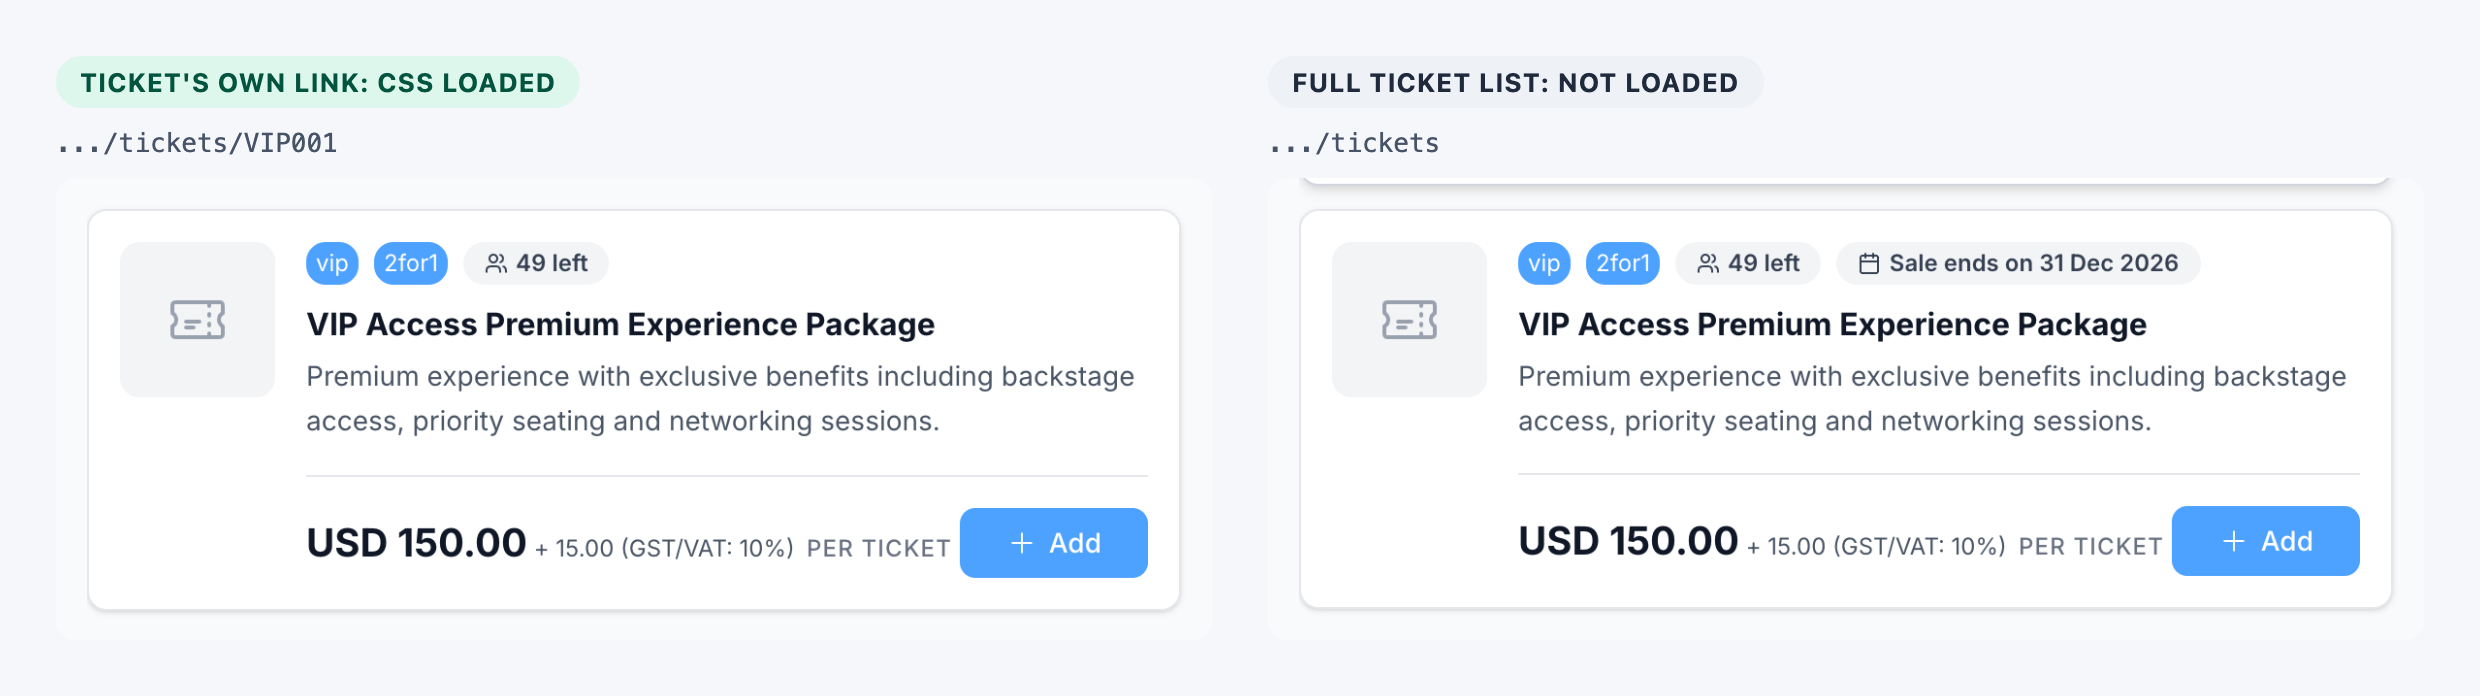
Note: Ticket Custom Code loads only on that ticket's direct link. To hide something for one ticket on the full ticket list, add the rule to Tracking Code with the ticket code at the end of the class name, as shown in "Hide it for one ticket on the full ticket list".

How to inject an external CSS file

If you'd rather keep your rules in a CSS file on your own website, inject the file instead of pasting the rules. You can then change the file at any time without opening Eventify.

  1. Create a CSS file with your rules, such as eventify-tickets.css in the first example below, and upload it to your website.
  2. Check that the file opens in a browser at a public https address, such as https://www.yourwebsite.com/eventify-tickets.css.
  3. Go to Event Dashboard > Registration > Registration Settings > Tracking Code and paste the second example below into Add code before </head> tag, with your file's address.
  4. Click Save & Next, then Publish > Publish Changes, and refresh your ticket page.

eventify-tickets.css (on your website):

.TICKET_END_DATE { display: none !important; }
.TICKET_STOCK { display: none !important; }

Code to paste in Tracking Code:

<style>@import url("https://www.yourwebsite.com/eventify-tickets.css");</style>

Use @import inside a style tag exactly as shown. Browsers can keep an older copy of the file for a while, so if an edit doesn't show, add a version number to the address, for example eventify-tickets.css?v=2, and save again.

Class names you can use

These names are added to the page so that you can style or hide parts of it. A name that starts with a dot is a class; one that starts with # is a single element. To target one ticket, add an underscore and the ticket code to any ticket-level class.

Ticket list

  • "Sale ends on" date: .TICKET_END_DATE
  • Ticket tags: .TICKET_TAG
  • "12 left" stock badge: .TICKET_STOCK (wide screens only; on phones this badge has no class name yet)
  • Ticket image: .TICKET_IMAGE, .TICKET_IMAGE_CONTAINER (use both)
  • Ticket description: .TICKET_DESCRIPTION
  • Price area: .TICKET_PRICE_SECTION, .TICKET_PRICE_SECTION_MOBILE (use both: the second one is the phone layout)
  • "Sold Out" label: .TICKET_SOLD_OUT
  • "Available from" label on tickets not yet on sale: .TICKET_UPCOMING
  • Approval note: .TICKET_APPROVAL_NOTE
  • Waitlist notice: .TICKET_WAITLIST_NOTIFICATION

Sessions

These apply when a ticket lets buyers pick sessions.

  • Session time: .SESSION_TIME
  • Session location: .SESSION_LOCATION
  • Speakers: .SESSION_SPEAKERS
  • Track: .SESSION_TRACK
  • Session image: .SESSION_IMAGE

Checkout

  • Card logos (Visa, Mastercard and others): .BUYER_VISA_CONTAINER
  • "All transactions are encrypted..." message: .BUYER_TRANSACTION_MESSAGE
  • VAT/GST No. field: .BUYER_VAT (only if your event doesn't need it)

Header and footer

  • Whole footer: #MAIN_FOOTER
  • Privacy Policy link: .FOOTER_PRIVACY_POLICY_SECTION
  • Terms & Conditions and Refund Policy links: .FOOTER_TERMS_CONDITIONS_SECTION (one class covers both)
  • Header on registration form pages: #MAIN_HEADER, or one part of it: .HEADER_EVENT_LOGO, .HEADER_EVENT_NAME, .HEADER_EVENT_DATE, .HEADER_EVENT_COUNTRY, .HEADER_EVENT_LANGUAGE_SECTION
Note: Hiding is visual only. The hidden text is still in the page for anyone who views its source. Never hide something buyers must see or fill in, such as a required checkout field, the terms checkbox, or price details your local consumer rules require.

How to find an element's class name

  1. Open your ticket page in Chrome, Edge or Firefox.
  2. Right-click the item you want to hide and choose Inspect.
  3. In the panel that opens, look at the highlighted line and the lines just above it for a name in CAPITAL LETTERS, such as TICKET_END_DATE.
  4. Use that name with a dot in front of it in your CSS. Ignore the lowercase names next to it, such as rounded-full or text-xs.

Common questions

I added the CSS to my own website, where the ticket page is embedded, but nothing changed. Why?

The embed is an iframe, which loads the ticket page from Eventify's address. Browsers keep the styles of your website away from a page loaded from another address, so the CSS has to be injected through Eventify's Tracking Code box instead.

Which pages does my CSS affect?

CSS in Tracking Code loads on every page of your event's ticket and registration portal. Use the class names in this article so that each rule only touches what you mean to hide. For a narrower scope, use a ticket's or a form's own Custom Code box.

I saved my CSS but the live page hasn't changed. Why?

Buyers see a published copy of your event's pages. Saving marks that copy as out of date, and Eventify refreshes it in the background, but that can take a while. Click Publish at the top of the dashboard, then Publish Changes, to update it straight away.

I added CSS to a ticket's Custom Code, but the full ticket list still shows the item. Why?

Ticket Custom Code loads only on that ticket's direct link. To hide something for one ticket on the full list, add the rule to Tracking Code with the ticket code at the end of the class name, for example .TICKET_END_DATE_3F9A1C.

The item shows for a moment and then disappears. Is that normal?

Yes, on embedded pages. When the ticket page sits inside an iframe, Eventify waits up to two seconds for your website's cookie-consent answer before it loads Tracking Code.

Some visitors still see the item I hid. Why?

If your website passes its cookie-consent choice to the embedded ticket page and a visitor declines both analytics and advertising cookies, Tracking Code does not load for that visitor, and neither does any CSS inside it.

Does hiding the sale end date change when sales close?

No. It only changes what buyers see. The ticket still stops selling on its sales end date.

Can I hide a whole ticket with CSS?

Don't. A ticket hidden with CSS is still on sale and can still be opened by its direct link.

Will my CSS keep working after Eventify updates?

The capitalised names (TICKET_, SESSION_, BUYER_, HEADER_, FOOTER_) are there for customisation, so target those. Lowercase styling names such as text-xs or rounded-full change between releases.

Does Eventify check my CSS?

No. Eventify saves the code exactly as you paste it. Try it on a test event first, and only inject files from sources you trust, because code in these boxes also runs on your checkout page.

Need more help? Contact Eventify support from the admin panel.

Related Topics You May Like

How to Give Attendees Access to Specific Event Days

Read post

How to Bulk Schedule Push Notifications from a Spreadsheet

Read post
The future of events
is here.

Summarise with AI

ChatGPT Claude Perplexity Google
PLATFORMS
Virtual Event PlatformHybrid Event PlatformIn-person Event PlatformMobile Event AppExpo & ExhibitionEvent Management PlatformEvent Registration PlatformTrade ShowCorporate Event AppEnterprise Event AppTrade Show AppTrade Show Management Software
PRODUCTS
Event Ticketing SoftwareEvent Check-in AppEvent Badge PrintingTicket Sales ReportLead Retrieval AppEvent Networking AppEvent Gamification AppEvent Poll & QAEvent Matchmaking AppEvent Concierge Service
RESOURCES
ContactAboutBlogCustomer StoriesFeature UpdatesPodcastsFAQReferral ProgramCommunity
OTHERS
Privacy PolicyTerms of UseBug Bounty & Responsible DisclosureSite MapRestricted BusinessesSecurity
Download Eventify App
Download on the App Store badge
Eventify is ISO 27001:2022 certified
iso 27001 certified logoAICPA SOC logogdpr logoSOC 2 TYPE 2 LOGO
Trustpilot logo with 5-star ratingBadge from SaaSworthy for Top 20 Fastest Growing Event Management Software in Q3 2023.Purple circular badge with colorful abstract flower and text '15th Global Eventex Awards 2025 Winner'.
Eventify is a leader in Mobile Event Apps on G2
Leader
High Performer
Leader
Best Support
Users Most Likely To Recommend
Easiest To Do Business With
Eventify company logo on dark background
© Eventify 2026. All rights reserved.
FacebookTwitterInstagramLinkedinYouTube icon