Nederlands
 Deutsch
 Français
 Español
 Italiano
 Svenska
 Português (Brasil)
 Português (Portugal)
 العربية
 Türkçe
 Polski



Building an event website is no less than a nightmare for many organizers. If you have never built one before, it can seem quite daunting, especially with so many event website builder options to choose from. But do not worry. You do not have to spend top dollar or waste days tinkering with AI until you get a website that works.
This guide walks through exactly how to create an event website without hiring a professional, in a single day. It fits neatly into the website-building step of a wider event planning timeline, so bookmark that guide too if you are still mapping out the rest of your event. Let us get started.
Key Takeaways
- Specify your goal: decide what your website should achieve (selling tickets, finding sponsors, or everything in between) so your website looks professional.
- Decide the platform: prioritize a website builder that can connect your website with the event management software.
- Set your website map: decide if you want a one-page or multi-page website, and then make a list of all webpages required.
- Build website pages: develop user-friendly website pages that provide ease to the visitor and make them attend your event.
- Add proper navigation: ensure you link all your pages to the menu and have a clear "Register" button on every page.
- Prioritize mobile optimization: make your website run smoothly on all mobile devices to maximize attendee count.
- Publish and promote: hit the "Live" button after previewing all the functionalities and promote your website.
Why Is Building an Event Website Essential
Social media posts get buried down the feed, emails get lost in inboxes, and even personalized texts get missed. Your website is the central hub for all the information regarding your event; something no other marketing channel can do for you.
Here are four key reasons that make a website important:
- Win Trust: your event website proves legitimacy and shows visitors that the experience will be worth their time and money.
- Rank on Search: make people find your event and register for it on Google, Bing, or Yahoo.
- Avoid Confusion: provide a central source of credible information regarding your event.
- Persuade Sponsors: use your website to easily pitch to potential event sponsors.
"Your event website is the one asset that keeps working before, during, and after the event. If it only exists to announce a date, you are leaving most of its value on the table."
Hussain Fakhruddin, Founder & CEO of Eventify
The payoff is measurable. According to Bizzabo's event statistics, the average event registration page converts 21.5% of visitors into registrants, and a dynamic, platform-connected registration flow converts at 24.4%, more than double the 11.6% rate of static pages. A well-built event website is not just a brochure; it is where that conversion actually happens.
How to Create an Event Website in 8 Steps
Here is our 8-step guide that will help you create an event website that will fortify your brand image and convert visitors into attendees. In Eventify's own research for this guide, content lead Ahmed Sohaib found that the single biggest reason event websites underperform is not design. It is skipping Step 1 and building without a clear goal first.
Quick jump: the 8 steps at a glance
- Choose the purpose for building your event website
- List down the pages your event website needs
- Decide how you will create it and pick an event website builder
- Choose your favorite template
- Build the website pages
- Set up navigation and CTAs
- Optimize for mobile and SEO
- Preview, publish, and promote
Step 1: Choose the Purpose for Building Your Event Website
Do not figure out the goal of your website while building it. Ensure you plan out what step you want visitors to take on the website first. Doing so will ensure that you provide a persuasive experience to your visitors and get the goal you set out to achieve.
For example, your goal might be to "make people register before you close down the early bird discounts" or to "sell more event tickets and make vendors book stalls for the event." Whatever goals are there, it is better to set them out first to ensure the website building experience is smooth.
Step 2: List Down the Pages for Your Website
Whether you build a single-page or multi-page website depends on the goal you set. You are better off with a single-page website if you are hosting a meetup, arranging a workshop, or hosting a webinar.
But building a multi-page website will be a wise option if you are going to host a recurring event. You can also dedicate pages for visitors, speakers, vendors, and sponsors to ensure all information is siloed and accessible.
Here is a basic map of website pages and the purposes they serve:
| Page | What goes on it | Primary call to action |
|---|---|---|
| Homepage | Event name, date, location (or platform, for online events), one-line event summary, event countdown | Register now |
| Agendas | Sessions, times, tracks, filters | Register now |
| Speakers | Photos, bios, topics, social links | View session or Register |
| Registration | Ticket types, prices, early-bird deadline | Buy ticket |
| Itinerary | Address, map, parking and transport, accessibility notes | Get directions |
| Sponsors and exhibitors | Logos, profiles, packages | Become a sponsor |
| FAQs | Refunds, dress code, schedule changes, access | Contact us |
| Contact details | Email, phone, contact form, social links | Send message |
If ticketing and registration sit at the center of your event, pair this page map with a closer look at event registration software so the Registration page connects cleanly to checkout.
Step 3: Decide How You Will Create Your Website
An event website is usually built with any of the four methods mentioned here. If you are comparing options for the best event website builder, the right one is simply whichever satisfies your event goals and provides the most value to the visitor. Here is a table to help you compare the four methods:
| Approach | Setup effort | Agenda and speaker pages | Registration and ticketing | Best for |
|---|---|---|---|---|
| Ticketing-platform event page (for example, Eventbrite) | Low | A template page with agenda and lineup sections | Built in | Simple, single events that do not need a full website |
| General website builder (for example, Squarespace or Wix Events) | Low to moderate | You build and update the pages yourself | Varies by builder; complex agendas and registration often need add-ons | Design-led sites for small to mid-sized events |
| WordPress with plugins | High: domain, hosting, theme and plugins | Handled through plugins | Handled through plugins | Teams with technical support. A basic build roughly costs $100 to $300 upfront, plus ongoing hosting and plugin fees |
| Event-platform website builder (Eventify) | Low to moderate | Live blocks pull your agenda, speakers, sponsors and exhibitors from your event | Same platform as your registration and ticketing | Meetups, webinars, conferences, expos, summits and recurring events |
The first three approaches require you to manage your website and event management platform side by side. But if you rely on an event-platform website builder like Eventify, you save yourself from the data entry hassle.
Eventify can pull the data from your event details and show it on the website. Put simply, it ensures that your event management website and event platform are in sync, and any change on one reflects on the other.
If budget is tight and you just need something live today, a ticketing-platform event page or a free tier of a general website builder (covered in the table above) is usually the fastest no-cost route.
Wondering how to create an event website through one of the four routes? Our blog on the best free and custom event website builders can also help you decide which platform is best suited for your needs.
Step 4: Choose Your Favorite Template
Eventify makes it easier to create a branded event website by providing powerful templates. These templates are fully customizable and ensure you do not miss out on any important features. You can fully change the look and feel of any of the provided templates to make your website as vibrant as your event.

Here is how to create an event website from the ground up in Eventify using a template:
- Navigate to the admin dashboard, then head to Setup and open Website Editor.
- Click on the New Website button and choose from any of the provided templates.
- Navigate through the visual editor to personalize the template per your needs.

Eventify website builder provides a lot of features that can satisfy the website building needs of first-time and seasoned event planners alike. Watch the tutorial below so you can familiarize yourself with the Eventify website builder and learn how to create an event website on the go.
Step 5: Build the Website Pages
Your website pages help you cater to the needs of every visitor (attendee, sponsor, or speaker) and boost website accessibility. Once you choose a theme, you can open the "Pages" panel on the left panel to start creating pages.

You can now use the add (+) / New Page button to start adding and customizing pages as per your needs.

Once you have created a page, you can access the Elements panel in the left sidebar to start customizing it. In the "Layouts" tab, you can find over two hundred ready-made blocks like Navigation, Hero, Features, About, Agenda, Speakers, and Sponsors. This method allows you to create all the pages you want faster.
On the right-side pane, you can access settings like headings, text, buttons, images, video, audio, maps, forms, and sliders for setting up every page however you want.
With the "Dynamic Blocks" feature on Eventify, you can be certain that all the information on your website is accurate and updated on time. Here is how you can get started with using dynamic blocks:
- Navigate to "Elements" and then "Layouts" in the Eventify Website Builder.
- Add your Agenda block and Speakers block.
- Create Sponsors & Exhibitors blocks if applicable.
- Decide whether to add a News block and Countdown block.
Step 6: Set Up Navigation and CTAs
Just like any other website builder, Eventify does not automatically add any new page you create to the menu of the homepage. You need to link pages to the homepage and the global header manually to provide a seamless navigation experience for visitors.
Here is how to create an event website that has proper navigation:
- If your page has no header, drag one in from Elements > Layouts > Navigation.
- Click a menu item.
- In the right panel, open the Design tab and scroll to Link.

- Open Page or URL…, choose Page, and select the page.
- Double-click the item to change its label if you want, then repeat for every menu item.
Use the Page link type for internal links so they keep working if you rename a page later. Keep the menu short, so visitors reach registration, the agenda, and venue details in one or two clicks.
On your pages, you can add Call to Action buttons to ensure visitors take your desired action. You can add a new button by navigating to the "Elements" section and clicking on the "Button" option.
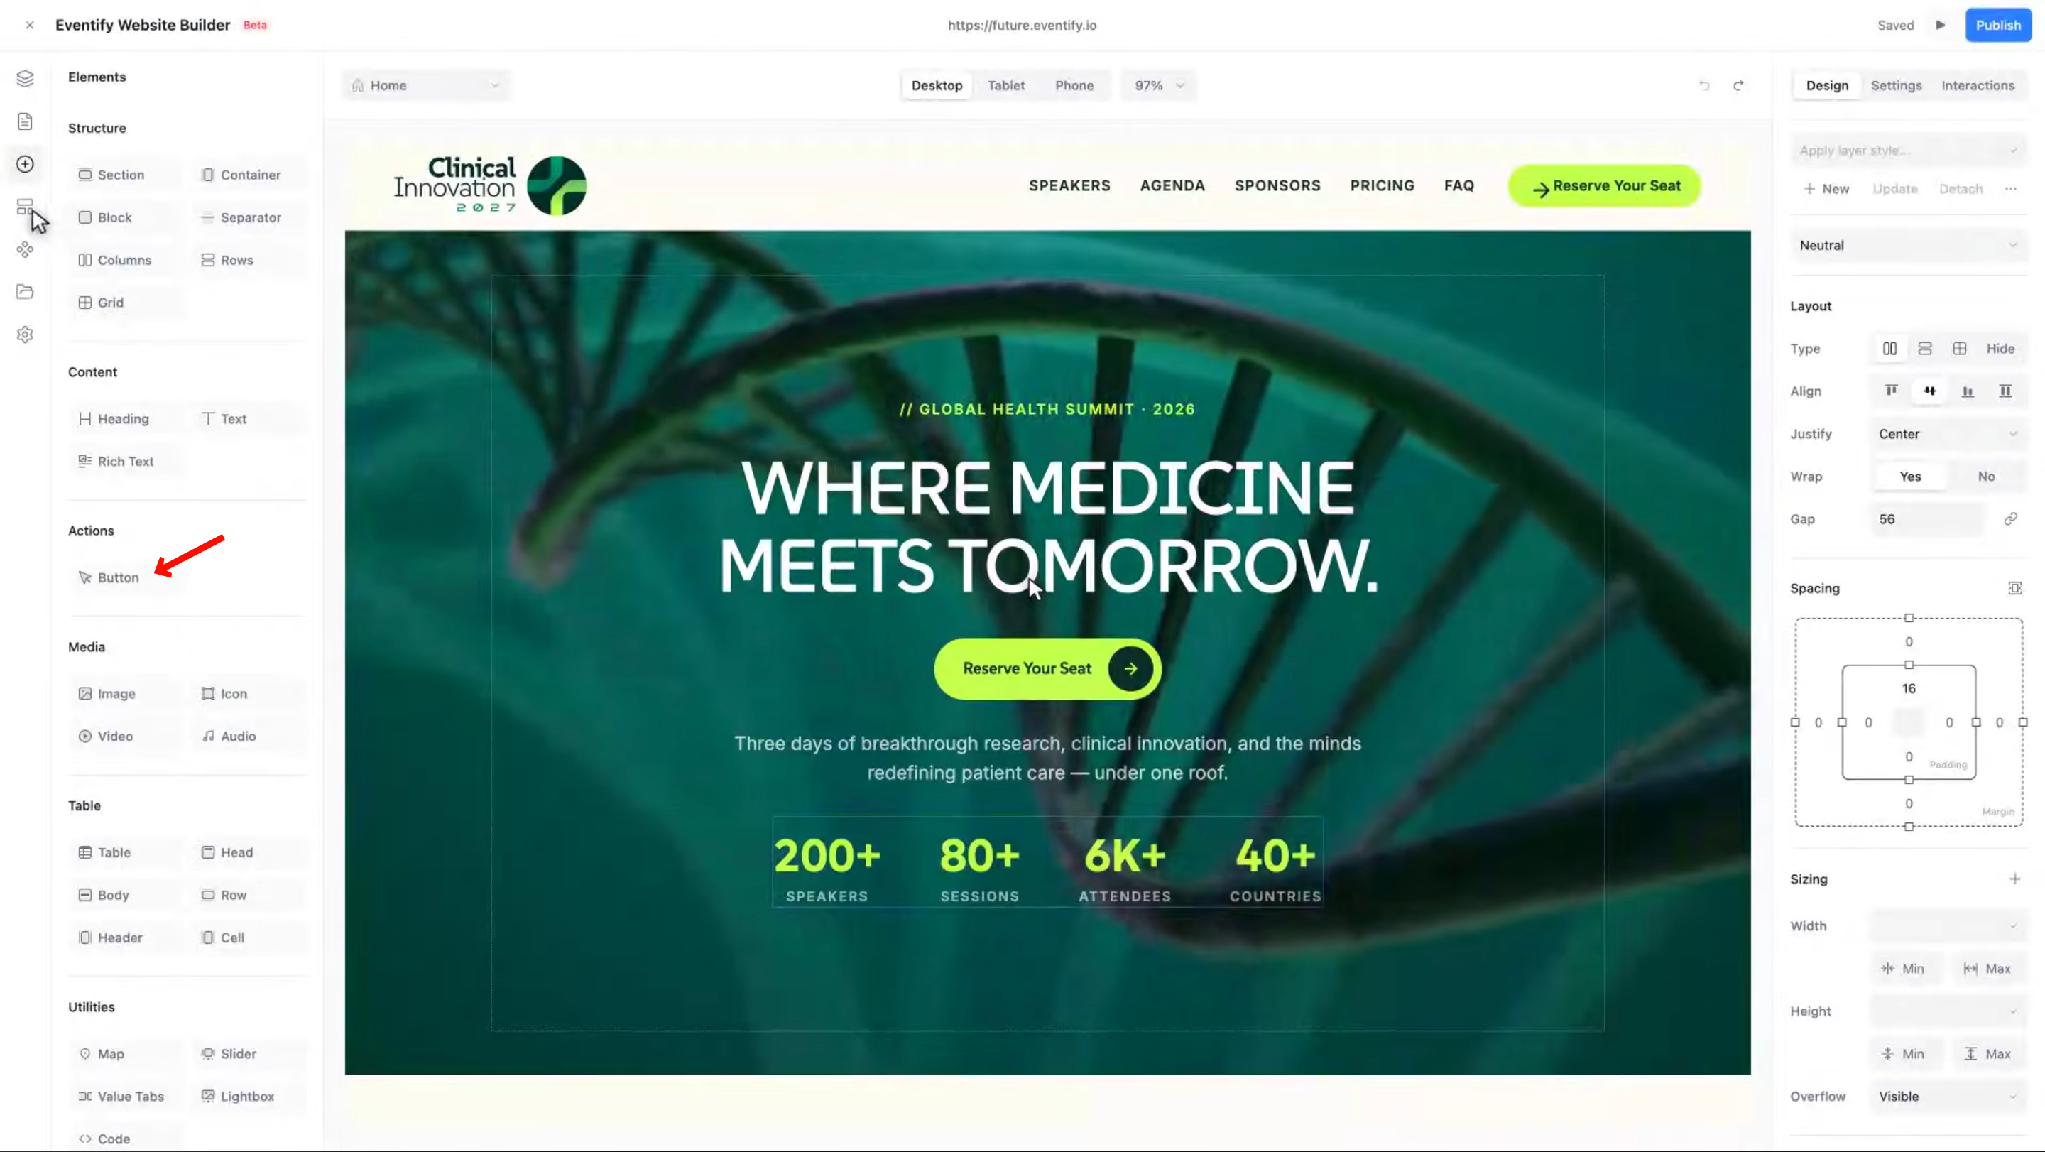
Buttons can link to a page, an external URL, a section on the same page, an email address, a phone number, or a downloadable file.
Point your primary button at your registration or ticket page and repeat it in the header, the hero, and after key sections such as the agenda, speakers, and pricing.
Step 7: Optimize for Mobile and SEO
Mobile and SEO optimization features of the Eventify website builder ensure that your website shows up on Google, Bing, and Yahoo, and converts casual website visitors into attendees.
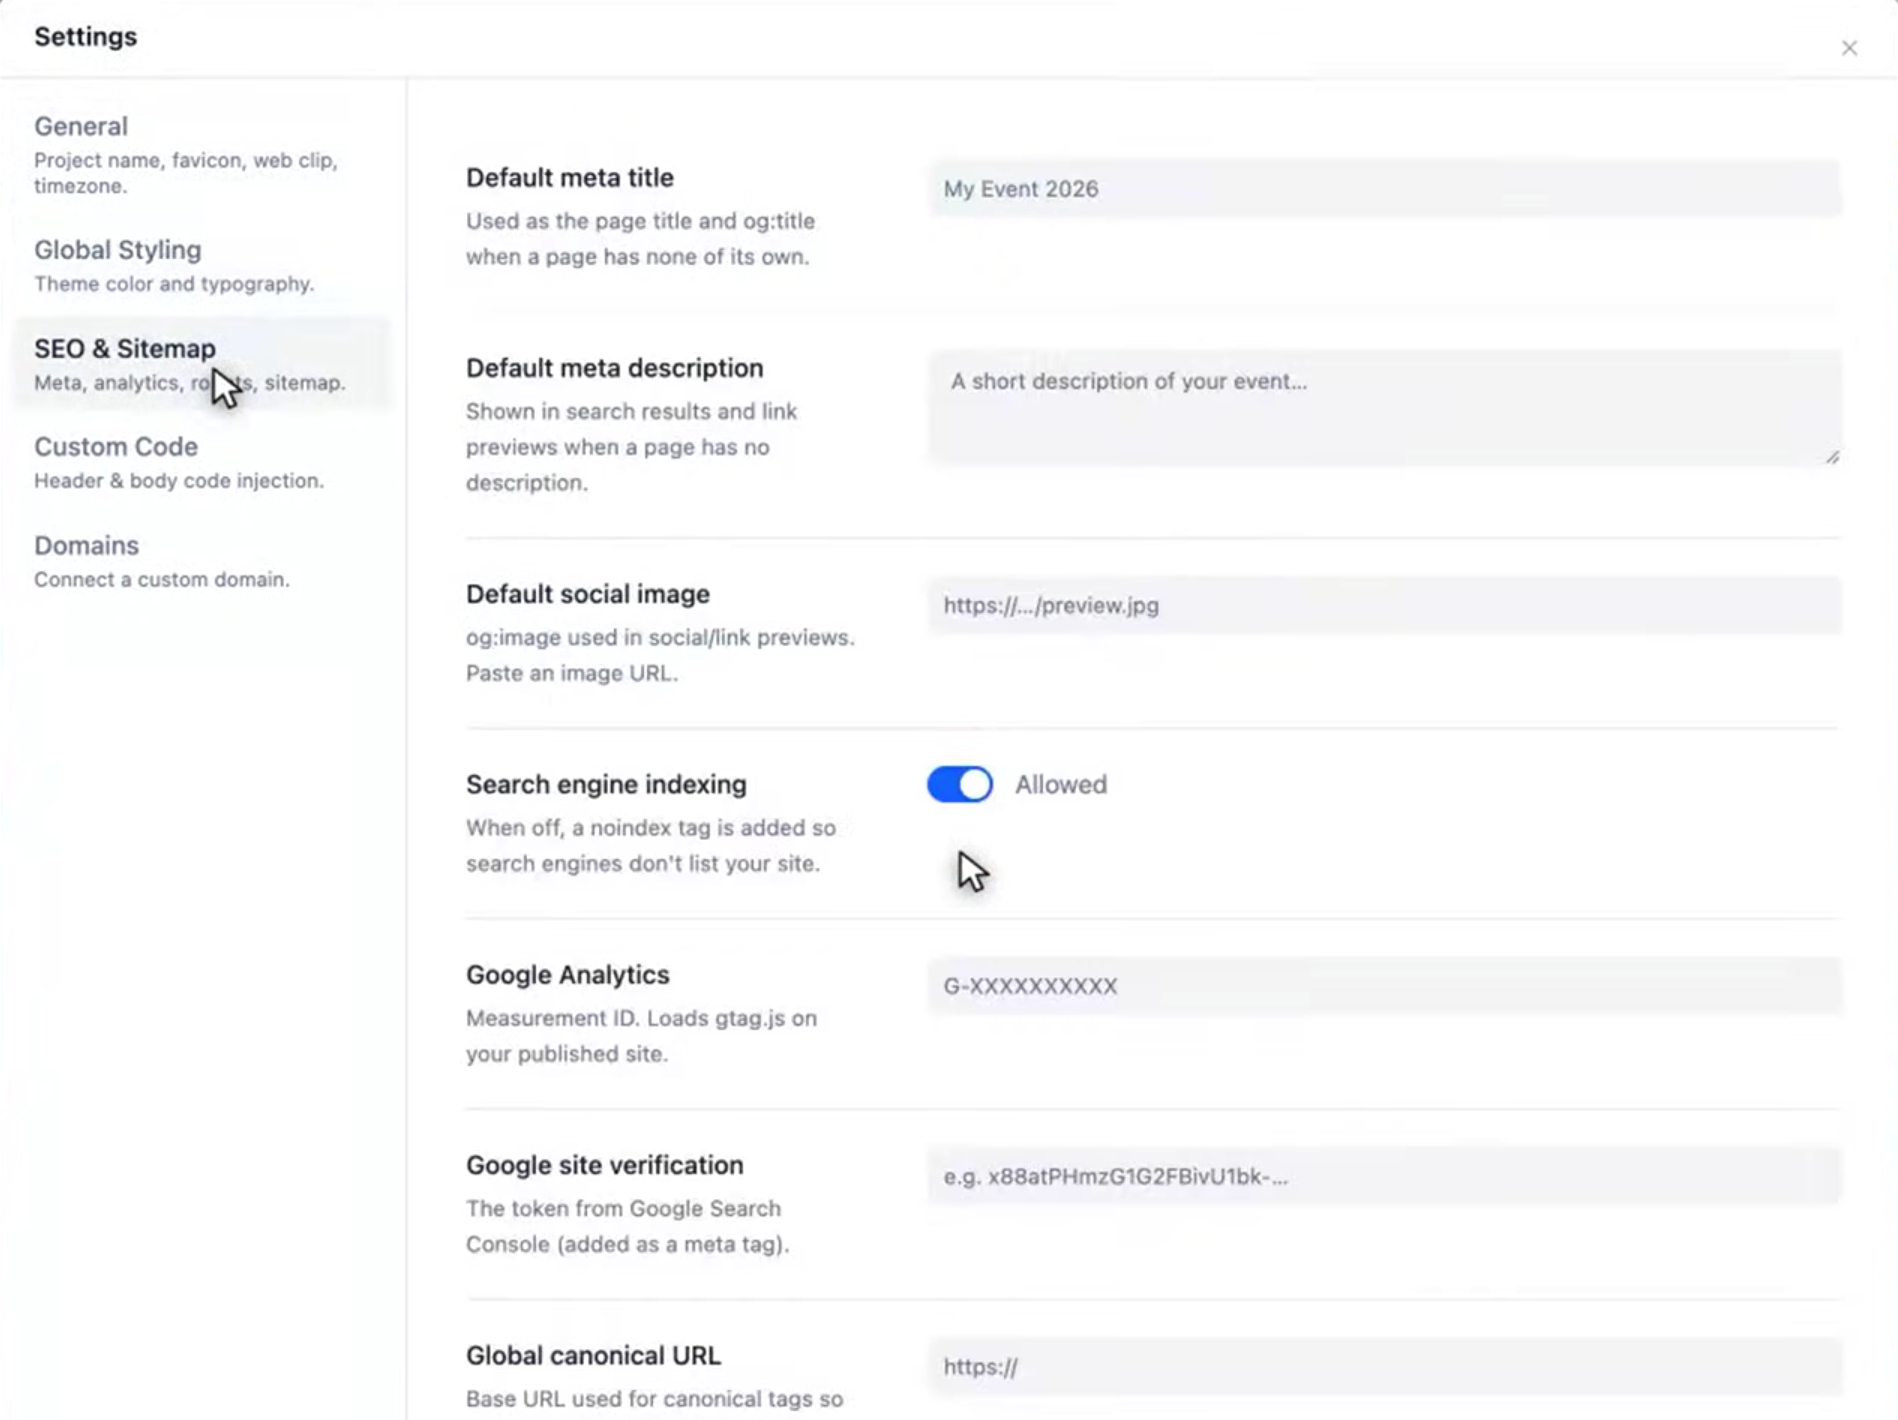
Inside the Eventify page builder, you can set SEO on every page. Open Page Settings > SEO and fill in:
- Page title: lead with what the page is, and include your main keyword naturally (for example, "Agenda of Your Event 2027 Edition").
- Description: one or two sentences that tell searchers why to click.
- Social image: the picture shown when the page is shared.
- Clean URLs: edit the slug in Page Settings > General so addresses are short and readable.
- Real headings: use one main heading per page and a logical order below it.
- Alt text and light images: describe every image, and keep large hero images to about 1 MB or less.
- An FAQ: answer real attendee questions in plain language, on the home page or a dedicated FAQ page.
- Analytics: use the Google Analytics and Google site verification integrations. Add your tracking code or pixels under Settings > Custom Code (head or body), and preview before you publish.
- Structured data: add the robots.txt file for your website to ensure search engines can fully understand your website navigation.
Most event-site visitors are on mobile. With the built-in responsive design functionality inside the Eventify website builder, you can make your website user-friendly for visitors on mobile and tablet.

If you are also weighing a dedicated app, our roundup of the best event apps breaks down what a companion app adds once people have registered.
Finish your desktop layout, then use the device switcher in the top bar to open Tablet and Mobile views. Changes you make there apply to that size and smaller, so you can reduce font sizes, stack rows into columns, and tighten spacing without touching your desktop design.
Step 8: Preview, Publish, and Promote
Once you are done with setting the layout of your website, you must review your progress before making your website live. The Preview functionality inside the Eventify website builder allows you to preview and make changes where required.
Just click Preview in the top bar for a read-only view of your site, and check every page on desktop, tablet, and mobile.

Now that your website is ready, it is time to connect it with your custom domain. Much like a business name, a domain name like youreventname.com is your registered web address that makes your website discoverable on a browser.
If you have not already bought your domain, you can register your domain name from any of the leading domain registrars that you prefer.

Go to Settings > Domains, enter your domain, and add the DNS record shown (typically a CNAME) at your registrar. DNS changes can take anywhere from a few minutes to a day, and the site must be published at least once.
Now that your event website is live under your domain name, it is time to make your target audience discover your website. Eventify provides a lot of features that allow you to promote your event website easily:
- Email your list. Our free event marketing email templates give you a head start.
- Put a QR code on printed material and signage, and pair it with our guide to event check-in and badge printing software to keep check-in on the day just as smooth.
- Share it on the social channels where your audience already spends time, and ask speakers, sponsors, and partners to do the same.
- Use paid ads if you need to reach a specific audience quickly, and fold website promotion into your wider event marketing plan so email, social, and paid efforts all point back to the same registration page.
- Once people register, keep them informed with email and push notifications.
- After the event, keep the site working for you: post a recap with photos and video, announce next year's dates, and use your event analytics to show sponsors what the event delivered.
A Note on Eventify Website Builder
Eventify Website Builder is currently in early beta, so you may occasionally see rough edges. If something does not behave as described here, refresh and try again, or contact support. The Website Builder knowledge base covers every feature in detail, including getting started, pages and navigation, styling and design, and troubleshooting.
Prefer an AI-Built Event Website? Use Claude and Cloudflare
If you would rather describe your site to an AI tool and build it with AI rather than drag blocks inside the Eventify website builder, Eventify supports an AI-assisted route too.
Eventify stays the source of truth for your agenda, speakers, ticket types, registration, and payments. Claude reads that data through the Eventify MCP and writes a single-page site from your description.
Cloudflare Pages hosts the result on its free plan and connects it to your domain. Registration buttons on the page link back to your Eventify event, so attendee data stays in one system.
You will need an Eventify account with your event in it, Claude connected to the Eventify MCP, and a Cloudflare account and domain. The full walkthrough is in Build an event website for free with Eventify, Claude and Cloudflare.
Event Website Launch Checklist
Use this focused checklist right before you flip your event website live. For the full run-up to event day, pair it with our broader event planning checklist.
Content
- Date, time, location (or platform and join instructions) are above the fold
- Agenda, speakers and ticket prices are complete and current
- FAQ and contact details are published
Conversion
- One clear primary call to action on every page
- Register button in the header, hero and after key sections
- Sponsor logos or past-event proof in place
Search
- Page title, description and social image set on every page
- Short, readable slugs
- Alt text on all images
- Staging or private pages set to noindex
Technical
- Every menu link tested in Preview
- Desktop, tablet and mobile views checked
- Analytics installed
- Custom domain connected and site published
Frequently Asked Questions
Here are the questions we hear most from organizers building their first event websites.
What is an event website?
An event website is a dedicated site, either one page or several, that centralizes everything attendees, speakers, and sponsors need to know: the date, location or platform, agenda, registration, and FAQs. Unlike a social post or email, an event site stays live and searchable for as long as you need it.
How long does it take to create an event website?
With an event-platform website builder like Eventify, most organizers create an event website in a single day by following the 8 steps in this guide. A fully custom build on WordPress or a general website builder usually takes longer, since you are assembling hosting, a theme, and plugins or add-ons yourself.
Can I create a free event website?
Yes. You can get your event website free of charge using a ticketing platform's built-in event page or a free tier of a general website builder, though both come with real limits on design and features. The fastest no-cost route is usually a ticketing platform page or a free website-builder tier, as covered earlier in this guide.
What is the best event website builder?
There is no single best event website builder for every organizer. If your agenda, speakers, and sponsors already live in an event management platform, an event-platform website builder like Eventify is usually the best event website builder for you, since it keeps both in sync automatically. For design-led, one-off sites with a simple agenda, a general website builder such as Wix Events or Squarespace can be the better fit.
Do I still need a website if I already have an event app or event management website?
Yes, in most cases. An event app is great for in-the-moment engagement once people have registered, but your event website is what search engines index, what you share in ads and emails, and what convinces a first-time visitor to register at all. The two work best together, not as substitutes.
How much does it cost to create an event website?
Costs range from $0 on a free plan to a few hundred dollars for a WordPress build with a theme and plugins, plus ongoing hosting. An event-platform website builder like Eventify folds the website into your existing event management subscription, so there is no separate line item.
Create Your Event Website with Eventify
You do not need a developer or a long project plan to create an event website that looks professional, ranks in search, and turns visitors into registrations. Across your events website, event app, and registration flow, Eventify website builder allows you to build it yourself within a day.
Event organizers rate Eventify 4.8/5 on G2. See why with a free trial of the Eventify event website builder.